Overview
The Miden client in Rust contains, the Miden client library and the Miden client cli.
Miden client library
The Miden client library is a Rust library that can be integrated into projects, allowing developers to interact with the Miden rollup.
The library provides a set of APIs and functions for executing transactions, generating proofs, and managing activity on the Miden network.
Miden client CLI
The Miden client also includes a command-line interface (CLI) that serves as a wrapper around the library, exposing its basic functionality in a user-friendly manner.
The CLI provides commands for interacting with the Miden rollup, such as submitting transactions, syncing with the network, and managing account data.
More information about the CLI can be found in the CLI section.
Software prerequisites
- Rust installation minimum version 1.88.
Install the client
Run the following command to install the miden-client:
cargo install miden-client-cli --locked
This installs the miden-client binary (at ~/.cargo/bin/miden-client).
Run the client
If the install worked correctly, you should be able to check the version by running:
miden-client --version
Once installed, you may run:
miden-client --help
This will show you the available commands and options for the client.
An more in depth tutorial can be fund in the Getting started section.
The Miden client offers a range of functionality for interacting with the Miden rollup.
Transaction execution
The Miden client facilitates the execution of transactions on the Miden rollup; allowing users to transfer assets, mint new tokens, and perform various other operations.
Proof generation
The Miden rollup supports user-generated proofs which are key to ensuring the validity of transactions on the Miden rollup.
To enable such proofs, the client contains the functionality for executing, proving, and submitting transactions.
Miden network interactivity
The Miden client enables users to interact with the Miden network. This includes syncing with the latest blockchain data and managing account information.
Account generation and tracking
The Miden client provides features for generating and tracking accounts within the Miden rollup ecosystem. Users can create accounts and track their transaction status.
The Miden client has the following architectural components:
tip
- The RPC client and the store are Rust traits.
- This allow developers and users to easily customize their implementations.
Store
The store is central to the client's design.
It manages the persistence of the following entities:
- Accounts; including their state history and related information such as vault assets and account code.
- Transactions and their scripts.
- Notes.
- Note tags.
- Block headers and chain information that the client needs to execute transactions and consume notes.
Because Miden allows off-chain executing and proving, the client needs to know about the state of the blockchain at the moment of execution. To avoid state bloat, however, the client does not need to see the whole blockchain history, just the chain history intervals that are relevant to the user.
The store can track any number of accounts, and any number of notes that those accounts might have created or may want to consume.
RPC client
The RPC client communicates with the node through a defined set of gRPC methods. The provided client works both in std and wasm environments.
Currently, these include:
CheckNullifiers: Returns proofs for specific provided full nullifiers.SyncNullifiers: Returns a list of tracked nullifiers that match specific prefixes. This is useful for checking if a note has been consumed without revealing the nullifiers that the client is tracking.GetAccountDetails: Returns the account details for a specific account ID. The available information will depend on the account type (public or private).GetAccountProofs: Returns the account data needed to perform a Foreign Procedure Invocation (FPI) on the specified foreign accounts.GetAccountStateDelta: Returns the state delta for a specific account ID between two block numbers.GetBlockByNumber: Returns a proven block given a specific block number.GetBlockHeaderByNumber: Returns the block header information given a specific block number.GetNotesById: Returns a list of notes given a specific note ID. The available information for each note will depend on the note type (public or private).GetNoteScriptByRoot: Returns the script associated with a specific note root.SubmitProvenTransaction: Sends a locally-proved transaction to the node for inclusion in the blockchain.SyncNotes: Asks the node for information about notes that have been created or consumed.SyncState: Asks the node for information relevant to the client. For example, specific account changes, whether relevant notes have been created or consumed, etc.
Transaction executor
The transaction executor uses the Miden VM to execute transactions. All transactions run within the transaction kernel.
When executing, the executor needs access to relevant blockchain history. The executor uses a DataStore interface for accessing this data. This means that there may be some coupling between the executor and the store.
Keystore
The keystore is responsible for storing and managing the private keys of the accounts tracked by the client.
These private keys are used by the executor to sign and authenticate transactions. Implementations for both rust and web keystores are provided.
Note Screener
The note screener is used to check the consumability of notes by tracked accounts. It performs fast static checks (e.g. checking the inputs for well known notes) and also dry runs of consumption transactions.
It can find the tracked accounts that can consume a note, and whether the note can be consumed at the moment or in the future.
State Sync component
The state sync component encapsulates the logic for dealing with synchronization of the client state with the network. It repeatedly queries the node with sync state requests until the chain tip is reached. On every requests it updates the provided tracked elements (accounts, notes, transactions, etc.) and returns an updated state at the end which can be used to update the store (this component does not modify the store directly).
The component also exposes a specific customizable callback which can be used to react to new note arrivals.
note
For a complete example on how to run the client and submit transactions to the Miden node, refer to the Getting started documentation.
This section shows you how to get started with Miden by generating a new Miden account, requesting funds from a public faucet, consuming private notes, and creating public pay-to-id-notes.
By the end of this tutorial, you will have:
- Configured the Miden client.
- Connected to a Miden node.
- Created an account and requested funds from the faucet.
- Transferred assets between accounts by creating and consuming notes.
Prerequisites
Rust
Download from the Rust website.
In this section, we show you how to create a new local Miden account and how to receive funds from the public Miden faucet website.
Configure the Miden client
The Miden client facilitates interaction with the Miden rollup and provides a way to execute and prove transactions.
Tip Check the Miden client documentation for more information.
-
If you haven't already done so as part of another tutorial, open your terminal and create a new directory to store the Miden client.
mkdir miden-client cd miden-client -
Install the Miden client.
cargo install miden-client-cli --lockedYou can now use the
miden-client --versioncommand, and you should seeMiden 0.10.0. -
Initialize the client. This creates the
miden-client.tomlfile.miden-client init --network testnet # Creates a miden-client.toml configured with the testnet node's IP
Create a new Miden account
-
Create a new account of type
mutableusing the following command:miden-client new-wallet --mutable -
List all created accounts by running the following command:
miden-client account -lYou should see something like this:

Save the account ID for a future step.
Request tokens from the public faucet
-
To request funds from the faucet navigate to the following website: Miden faucet website.
-
Copy the Account ID printed by the
miden account -lcommand in the previous step. Feel free to change the amount of tokens to issue. -
Paste this ID into the Request test tokens input field on the faucet website and click Send Private Note.
Tip You can also click Send Public Note. If you do this, the note's details will be public and you will not need to download and import it, so you can skip to Sync the client.
-
After a few seconds your browser should download - or prompt you to download - a file called
note.mno(mno = Miden note). It contains the funds the faucet sent to your address. -
Save this file on your computer, you will need it for the next step.
Import the note into the Miden client
-
Import the private note that you have received using the following commands:
miden-client import <path-to-note>/note.mno -
You should see something like this:
Successfully imported note 0x0ff340133840d35e95e0dc2e62c88ed75ab2e383dc6673ce0341bd486fed8cb6 -
Now that the note has been successfully imported, you can view the note's information using the following command:
miden-client notes -
You should see something like this:

Tip: The importance of syncing
- As you can see, the note is listed as
Expected.- This is because you have received a private note but have not yet synced your view of the rollup to check that the note is the result of a valid transaction.
- Hence, before consuming the note we will need to update our view of the rollup by syncing.
- Many users could have received the same private note, but only one user can consume the note in a transaction that gets verified by the Miden operator.
Sync the client
Do this periodically to keep informed about any updates on the node by running the sync command:
miden-client sync
You will see something like this as output:
State synced to block 179672
New public notes: 0
Committed notes: 1
Tracked notes consumed: 0
Tracked accounts updated: 0
Locked accounts: 0
Committed transactions: 0
Consume the note & receive the funds
-
Now that we have synced the client, the input-note imported from the faucet should have a
Committedstatus, confirming it exists at the rollup level:miden-client notes -
You should see something like this:

-
Find your account and note id by listing both
accountsandnotes:miden-client account miden-client notes -
Consume the note and add the funds from its vault to our account using the following command:
miden-client consume-notes --account <Account-Id> <Note-Id> -
You should see a confirmation message like this:
-
After confirming you can view the new note status by running the following command:
miden-client notes -
You should see something like this:

-
The note is
Processing. This means that the proof of the transaction was sent, but there is no network confirmation yet. You can update your view of the rollup by syncing again:miden-client sync -
After syncing, you should have received confirmation of the consumed note. You should see the note as
Consumedafter listing the notes:miden-client notes
Amazing! You just have created a client-side zero-knowledge proof locally on your machine and submitted it to the Miden rollup.
Tip You only need to copy the top line of characters of the Note ID.
View confirmations
-
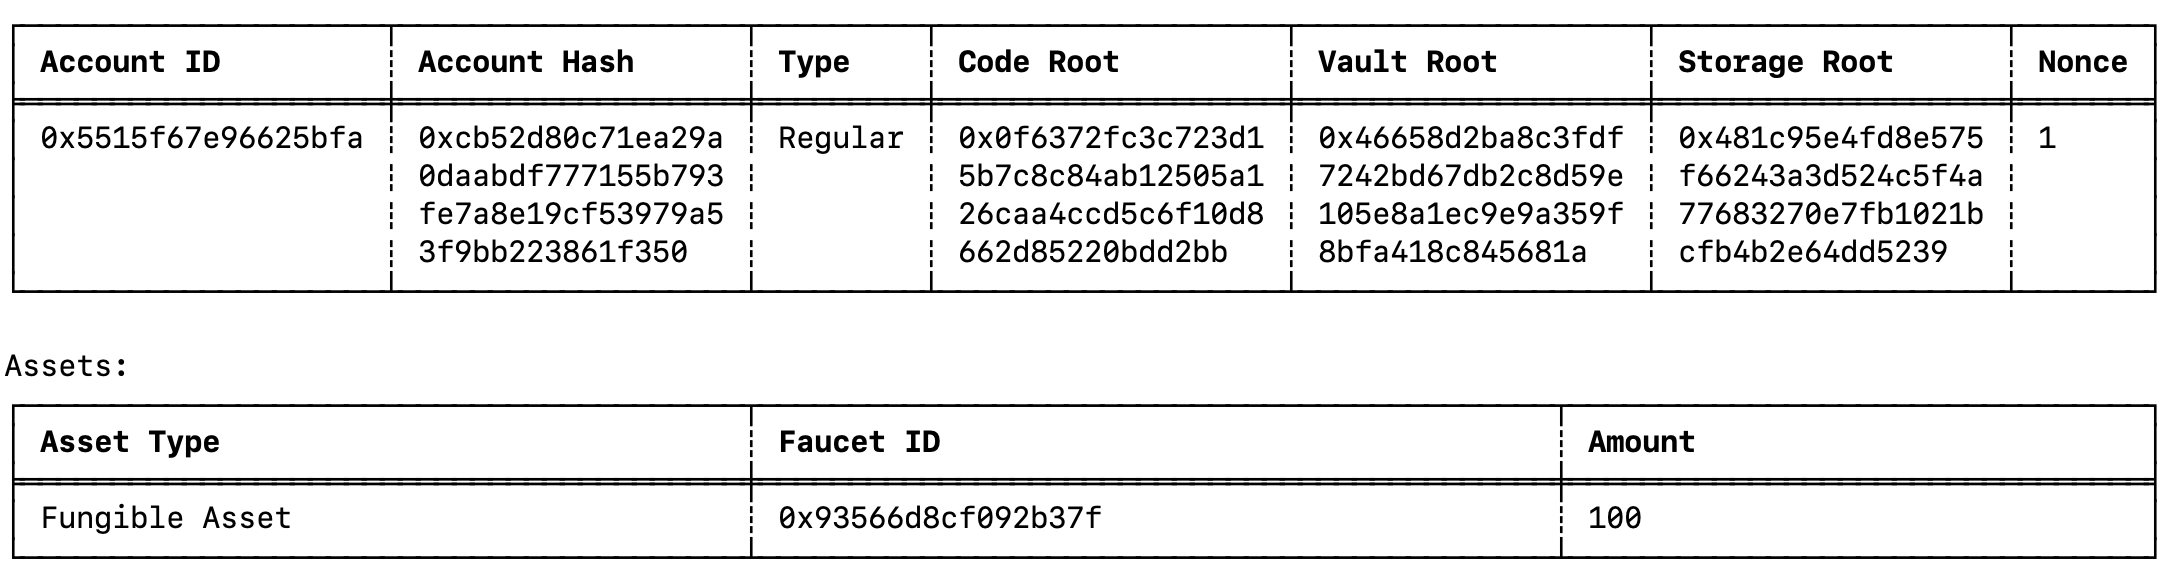
View your updated account's vault containing the tokens sent by the faucet by running the following command:
miden-client account --show <Account-Id> -
You should now see your accounts vault containing the funds sent by the faucet.
Congratulations!
You have successfully configured and used the Miden client to interact with a Miden rollup and faucet.
You have performed basic Miden rollup operations like submitting proofs of transactions, generating and consuming notes.
For more information on the Miden client, refer to the Miden client documentation.
Debugging tips (clear state and folder)
-
Need a fresh start? All state is maintained in
store.sqlite3, located in the directory defined in themiden-client.tomlfile. If you want to clear all state, delete this file. It recreates on any command execution. -
Getting an error? Only execute the
miden-clientcommand in the folder where yourmiden-client.tomlis located.
In this section, we show you how to execute transactions and send funds to another account using the Miden client and public notes.
Important: Prerequisite steps
- You should have already followed the prerequisite steps and get started documents.
- You should have not reset the state of your local client.
Create a second client
Tip Remember to use the Miden client documentation for clarifications.
This is an alternative to the private P2P transactions process.
In this tutorial, we use two different clients to simulate two different remote users who don't share local state.
To do this, we use two terminals with their own state (using their own miden-client.toml).
-
Create a new directory to store the new client.
mkdir miden-client-2 cd miden-client-2 -
Initialize the client. This creates the
miden-client.tomlfile line-by-line.miden-client init --network testnet # Creates a miden-client.toml file configured with the testnet node's IP -
On the new client, create a new basic account:
miden-client new-wallet --mutable -s publicWe refer to this account as Account C. Note that we set the account's storage mode to
public, which means that the account details are public and its latest state can be retrieved from the node. -
List and view the account with the following command:
miden-client account -l
Transfer assets between accounts
-
Now we can transfer some of the tokens we received from the faucet to our new account C. Remember to switch back to
miden-clientdirectory, since you'll be making the txn from Account ID A.To do this, from the first client run:
miden-client send --sender <basic-account-id-A> --target <basic-account-id-C> --asset 50::<faucet-account-id> --note-type publicNote The faucet account ID can be found on the Miden faucet website under the title Miden faucet.
This generates a Pay-to-ID (
P2ID) note containing50tokens, transferred from one account to the other. As the note is public, the second account can receive the necessary details by syncing with the node. -
First, sync the account on the new client.
miden-client sync -
At this point, we should have received the public note details.
miden-client notes --listBecause the note was retrieved from the node, the commit height will be included and displayed.
-
Have account C consume the note.
miden-client consume-notes --account <regular-account-ID-C> <input-note-id>Tip It's possible to use a short version of the note id: 7 characters after the
0xis sufficient, e.g.0x6ae613a.
That's it!
Account C has now consumed the note and there should be new assets in the account:
miden-client account --show <account-ID>
Clear state
All state is maintained in store.sqlite3, located in the directory defined in the miden-client.toml file.
To clear all state, delete this file. It recreates on any command execution.
In this section, we show you how to make private transactions and send funds to another account using the Miden client.
Important: Prerequisite steps
- You should have already followed the prerequisite steps and get started documents.
- You should not have reset the state of your local client.
Create a second account
Tip Remember to use the Miden client documentation for clarifications.
-
Create a second account to send funds with. Previously, we created a type
mutableaccount (account A). Now, create anothermutable(account B) using the following command:miden-client new-wallet --mutable -
List and view the newly created accounts with the following command:
miden-client account -l -
You should see two accounts:

Transfer assets between accounts
-
Now we can transfer some of the tokens we received from the faucet to our second account B.
To do this, run:
miden-client send --sender <regular-account-id-A> --target <regular-account-id-B> --asset 50::<faucet-account-id> --note-type privateNote The faucet account ID can be found on the Miden faucet website under the title Miden faucet.
This generates a private Pay-to-ID (
P2ID) note containing50assets, transferred from one account to the other. -
First, sync the accounts.
miden-client sync -
Get the second note id.
miden-client notes -
Have the second account consume the note.
miden-client consume-notes --account <regular-account-ID-B> <input-note-id>Tip It's possible to use a short version of the note id: 7 characters after the
0xis sufficient, e.g.0x6ae613a.You should now see both accounts containing faucet assets with amounts transferred from
Account AtoAccount B. -
Check the second account:
miden-client account --show <regular-account-ID-B>
-
Check the original account:
miden-client account --show <regular-account-ID-A>
Wanna do more? Sending public notes
Congratulations!
You have successfully configured and used the Miden client to interact with a Miden rollup and faucet.
You have performed basic Miden rollup operations like submitting proofs of transactions, generating and consuming notes.
For more information on the Miden client, refer to the Miden client documentation.
Clear data
All state is maintained in store.sqlite3, located in the directory defined in the miden-client.toml file.
To clear all state, delete this file. It recreates on any command execution.
To use the Miden client library in a Rust project, include it as a dependency.
In your project's Cargo.toml, add:
miden-client = { version = "0.11" }
Client instantiation
Spin up a client using the following Rust code and supplying a store and RPC endpoint.
#![allow(unused)]
fn main() {
use miden_client_sqlite_store::SqliteStore;
let sqlite_store = SqliteStore::new("path/to/store".try_into()?).await?;
let store = Arc::new(sqlite_store);

// Generate a random seed for the RpoRandomCoin.
let mut rng = rand::rng();
let coin_seed: [u64; 4] = rng.random();

// Initialize the random coin using the generated seed.
let rng = RpoRandomCoin::new(coin_seed.map(Felt::new));

// Create a keystore to manage cryptographic keys.
let keystore = FilesystemKeyStore::new(path.into())?;

// Instantiate the client using a gRPC client
let endpoint = Endpoint::new("https".into(), "localhost".into(), Some(57291));
let client:Client = Client::new(
    Arc::new(GrpcClient::new(&endpoint, 10_000)),
    rng,
    store,
    Some(Arc::new(keystore)), // Authenticator is optional - use None if no authentication is needed
    false, // Set to true for debug mode, if needed.
    None, // Set to Some to enable stale transactions after an amount of blocks.
    None, // Set to Some to enable recency checks when executing transactions.
);
}
Create local account
With the Miden client, you can create and track any number of public and local accounts. For local accounts, the state is tracked locally, and the rollup only keeps commitments to the data, which in turn guarantees privacy.
The AccountBuilder can be used to create a new account with the specified parameters and components. The following code creates a new local account:
#![allow(unused)]
fn main() {
let key_pair = SecretKey::with_rng(client.rng());

let new_account = AccountBuilder::new(init_seed) // Seed should be random for each account
    .account_type(AccountType::RegularAccountImmutableCode)
    .storage_mode(AccountStorageMode::Private)
    .with_auth_component(AuthRpoFalcon512::new(key_pair.public_key()))
    .with_component(BasicWallet)
    .build()?;
keystore.add_key(&AuthSecretKey::RpoFalcon512(key_pair)).await?;
client.add_account(&new_account, false).await?;
}
Once an account is created, it is kept locally and its state is automatically tracked by the client.
To create an public account, you can specify AccountStorageMode::Public like so:
let key_pair = SecretKey::with_rng(client.rng());
let anchor_block = client.get_latest_epoch_block().await.unwrap();

let new_account = AccountBuilder::new(init_seed) // Seed should be random for each account
    .anchor((&anchor_block).try_into().unwrap())
    .account_type(AccountType::RegularAccountImmutableCode)
    .storage_mode(AccountStorageMode::Public)
    .with_auth_component(AuthRpoFalcon512::new(key_pair.public_key()))
    .with_component(BasicWallet)
    .build()?;
keystore.add_key(&AuthSecretKey::RpoFalcon512(key_pair)).await?;
client.add_account(&new_account, false).await?;
The account's state is also tracked locally, but during sync the client updates the account state by querying the node for the most recent account data.
Execute transaction
In order to execute a transaction, you first need to define which type of transaction is to be executed. This may be done with the TransactionRequest which represents a general definition of a transaction. Some standardized constructors are available for common transaction types.
Here is an example for a pay-to-id transaction type:
#![allow(unused)]
fn main() {
// Define asset
let faucet_id = AccountId::from_hex(faucet_id)?;
let fungible_asset = FungibleAsset::new(faucet_id, *amount)?.into();

let sender_account_id = AccountId::from_hex(bob_account_id)?;
let target_account_id = AccountId::from_hex(alice_account_id)?;
let payment_description = PaymentNoteDescription::new(
    vec![fungible_asset.into()],
    sender_account_id,
    target_account_id,
);

let transaction_request = TransactionRequestBuilder::new().build_pay_to_id(
    payment_description,
    None,
    NoteType::Private,
    client.rng(),
)?;

// Execute transaction. No information is tracked after this.
let transaction_execution_result = client.new_transaction(sender_account_id, transaction_request.clone()).await?;

// Prove and submit the transaction, which is stored alongside created notes (if any)
client.submit_transaction(transaction_execution_result).await?
}
You can decide whether you want the note details to be public or private through the note_type parameter.
You may also customize the transaction request with the other TransactionRequestBuilder methods. This allows you to run custom code, with custom note arguments and additional output/input notes as well.
The following document lists the commands that the CLI currently supports.
tip
Use --help as a flag on any command for more information.
Usage
Call a command on the miden-client like this:
miden-client <command> <flags> <arguments>
Optionally, you can include the --debug flag to run the command with debug mode, which enables debug output logs from scripts that were compiled in this mode:
miden-client --debug <flags> <arguments>
Note that the debug flag overrides the MIDEN_DEBUG environment variable.
Commands
init
Creates a configuration file for the client in the current directory.
# This will create a config file named `miden-client.toml` using default values
# This file contains information useful for the CLI like the RPC provider and database path
miden-client init --network <network>

# You can set up the CLI for any of the default networks
miden-client init --network testnet
miden-client init --network devnet
miden-client init --network localhost

# You can also specify a custom network
miden-client init --network 18.203.155.106
# You can specify the port
miden-client init --network 18.203.155.106:8080
# You can also specify the protocol (http/https)
miden-client init --network https://18.203.155.106
# You can specify both
miden-client init --network https://18.203.155.106:1234

# You can use the --store-path flag to override the default store config
miden-client init --store-path db/store.sqlite3

# You can use the --block-delta flag to set maximum number of blocks the client can be behind
miden-client init --block-delta 250

# You can provide both flags
miden-client init --network 18.203.155.106 --store-path db/store.sqlite3

# You can set a remote prover to offload the proving process (along with the `--delegate-proving` flag in transaction commands)
miden-client init --remote-prover-endpoint <PROVER_URL>
More information on the configuration file can be found in the configuration section.
account
Inspect account details.
Action Flags
| Flags | Description | Short Flag |
|---|---|---|
--list | List all accounts monitored by this client | -l |
--show <ID> | Show details of the account for the specified ID | -s |
--default <ID> | Manage the setting for the default account | -d |
The --show flag also accepts a partial ID instead of the full ID. For example, instead of:
miden-client account --show 0x8fd4b86a6387f8d8
You can call:
miden-client account --show 0x8fd4b86
For the --default flag, if <ID> is "none" then the previous default account is cleared. If no <ID> is specified then the default account is shown.
new-wallet
Creates a new wallet account.
A basic wallet is comprised of a basic authentication component (for RPO Falcon signature verification), alongside a basic wallet component (for sending and receiving assets).
This command has three optional flags:
--storage-mode <TYPE>: Used to select the storage mode of the account (private if not specified). It may receive "private" or "public".--mutable: Makes the account code mutable (it's immutable by default).--extra-components <TEMPLATE_FILES_LIST>: Allows to pass a list of account component template files which can be added to the account. If the templates contain placeholders, the CLI will prompt the user to enter the required data for instantiating storage appropriately.--init-storage-data-path <INIT_STORAGE_DATA_PATH>: Specifies an optional file path to a TOML file containing key/value pairs used for initializing storage. Each key should map to a placeholder within the provided component templates. The CLI will prompt for any keys that are not present in the file.
After creating an account with the new-wallet command, it is automatically stored and tracked by the client. This means the client can execute transactions that modify the state of accounts and track related changes by synchronizing with the Miden network.
new-account
Creates a new account and saves it locally.
An account may be composed of one or more components, each with its own storage and distinct functionality. This command lets you build a custom account by selecting an account type and optionally adding extra component templates.
This command has four flags:
--storage-mode <STORAGE_MODE>: Specifies the storage mode of the account. It accepts either "private" or "public", with "private" as the default.--account-type <ACCOUNT_TYPE>: Specifies the type of account to create. Accepted values are:fungible-faucetnon-fungible-faucetregular-account-immutable-coderegular-account-updatable-code
--component-templates <COMPONENT_TEMPLATES>: Allows you to provide a list of file paths for account component template files to include in the account. These components are looked up from your configuredcomponent_template_directoryfield inmiden-client.toml.--init-storage-data-path <INIT_STORAGE_DATA_PATH>: Specifies an optional file path to a TOML file containing key/value pairs used for initializing storage. Each key should map to a placeholder within the provided component templates. The CLI will prompt for any keys that are not present in the file.
After creating an account with the new-account command, the account is stored locally and tracked by the client, enabling it to execute transactions and synchronize state changes with the Miden network.
Examples
# Create a new wallet with default settings (private storage, immutable, no extra components)
miden-client new-wallet

# Create a new wallet with public storage and a mutable code
miden-client new-wallet --storage-mode public --mutable

# Create a new wallet that includes extra components from local templates
miden-client new-wallet --extra-components template1,template2

# Create a fungible faucet with interactive input
miden-client new-account --account-type fungible-faucet -c basic-fungible-faucet

# Create a fungible faucet with preset fields
miden-client new-account --account-type fungible-faucet --component-templates basic-fungible-faucet --init-storage-data-path init_data.toml
info
View a summary of the current client state.
notes
View and manage notes.
Action Flags
| Flags | Description | Short Flag |
|---|---|---|
--list [<filter>] | List input notes | -l |
--show <ID> | Show details of the input note for the specified note ID | -s |
The --list flag receives an optional filter:
- expected: Only lists expected notes.
- committed: Only lists committed notes.
- consumed: Only lists consumed notes.
- processing: Only lists processing notes.
- consumable: Only lists consumable notes. An additional --account-id <ID> flag may be added to only show notes consumable by the specified account.
If no filter is specified then all notes are listed.
The --show flag also accepts a partial ID instead of the full ID. For example, instead of:
miden-client notes --show 0x70b7ecba1db44c3aa75e87a3394de95463cc094d7794b706e02a9228342faeb0
You can call:
miden-client notes --show 0x70b7ec
sync
Sync the client with the latest state of the Miden network. Shows a brief summary at the end.
tags
View and add tags.
Action Flags
| Flag | Description | Aliases |
|---|---|---|
--list | List all tags monitored by this client | -l |
--add <tag> | Add a new tag to the list of tags monitored by this client | -a |
--remove <tag> | Remove a tag from the list of tags monitored by this client | -r |
tx
View transactions.
Action Flags
| Command | Description | Aliases |
|---|---|---|
--list | List tracked transactions | -l |
After a transaction gets executed, two entities start being tracked:
- The transaction itself: It follows a lifecycle from
Pending(initial state) andCommitted(after the node receives it). It may also beDiscardedif the transaction was not included in a block. - Output notes that might have been created as part of the transaction (for example, when executing a pay-to-id transaction).
Transaction creation commands
mint
Creates a note that contains a specific amount tokens minted by a faucet, that the target Account ID can consume.
Usage: miden-client mint --target <TARGET ACCOUNT ID> --asset <AMOUNT>::<FAUCET ID> --note-type <NOTE_TYPE>
consume-notes
Account ID consumes a list of notes, specified by their Note ID.
Usage: miden-client consume-notes --account <ACCOUNT ID> [NOTES]
For this command, you can also provide a partial ID instead of the full ID for each note. So instead of
miden-client consume-notes --account <some-account-id> 0x70b7ecba1db44c3aa75e87a3394de95463cc094d7794b706e02a9228342faeb0 0x80b7ecba1db44c3aa75e87a3394de95463cc094d7794b706e02a9228342faeb0
You can do:
miden-client consume-notes --account <some-account-id> 0x70b7ecb 0x80b7ecb
Additionally, you can optionally not specify note IDs, in which case any note that is known to be consumable by the executor account ID will be consumed.
Either Expected or Committed notes may be consumed by this command, changing their state to Processing. It's state will be updated to Consumed after the next sync.
send
Sends assets to another account. Sender Account creates a note that a target Account ID can consume. The asset is identified by the tuple (FAUCET ID, AMOUNT). The note can be configured to be recallable making the sender able to consume it after a height is reached.
Usage: miden-client send --sender <SENDER ACCOUNT ID> --target <TARGET ACCOUNT ID> --asset <AMOUNT>::<FAUCET ID> --note-type <NOTE_TYPE> <RECALL_HEIGHT>
swap
The source account creates a SWAP note that offers some asset in exchange for some other asset. When another account consumes that note, it will receive the offered asset amount and the requested asset will removed from its vault (and put into a new note which the first account can then consume). Consuming the note will fail if the account doesn't have enough of the requested asset.
Usage: miden-client swap --source <SOURCE ACCOUNT ID> --offered-asset <OFFERED AMOUNT>::<OFFERED FAUCET ID> --requested-asset <REQUESTED AMOUNT>::<REQUESTED FAUCET ID> --note-type <NOTE_TYPE>
Tips
For send and consume-notes, you can omit the --sender and --account flags to use the default account defined in the config. If you omit the flag but have no default account defined in the config, you'll get an error instead.
For every command which needs an account ID (either wallet or faucet), you can also provide a partial ID instead of the full ID for each account. So instead of
miden-client send --sender 0x80519a1c5e3680fc --target 0x8fd4b86a6387f8d8 --asset 100::0xa99c5c8764d4e011
You can do:
miden-client send --sender 0x80519 --target 0x8fd4b --asset 100::0xa99c5c8764d4e011
!!! note The only exception is for using IDs as part of the asset, those should have the full faucet's account ID.
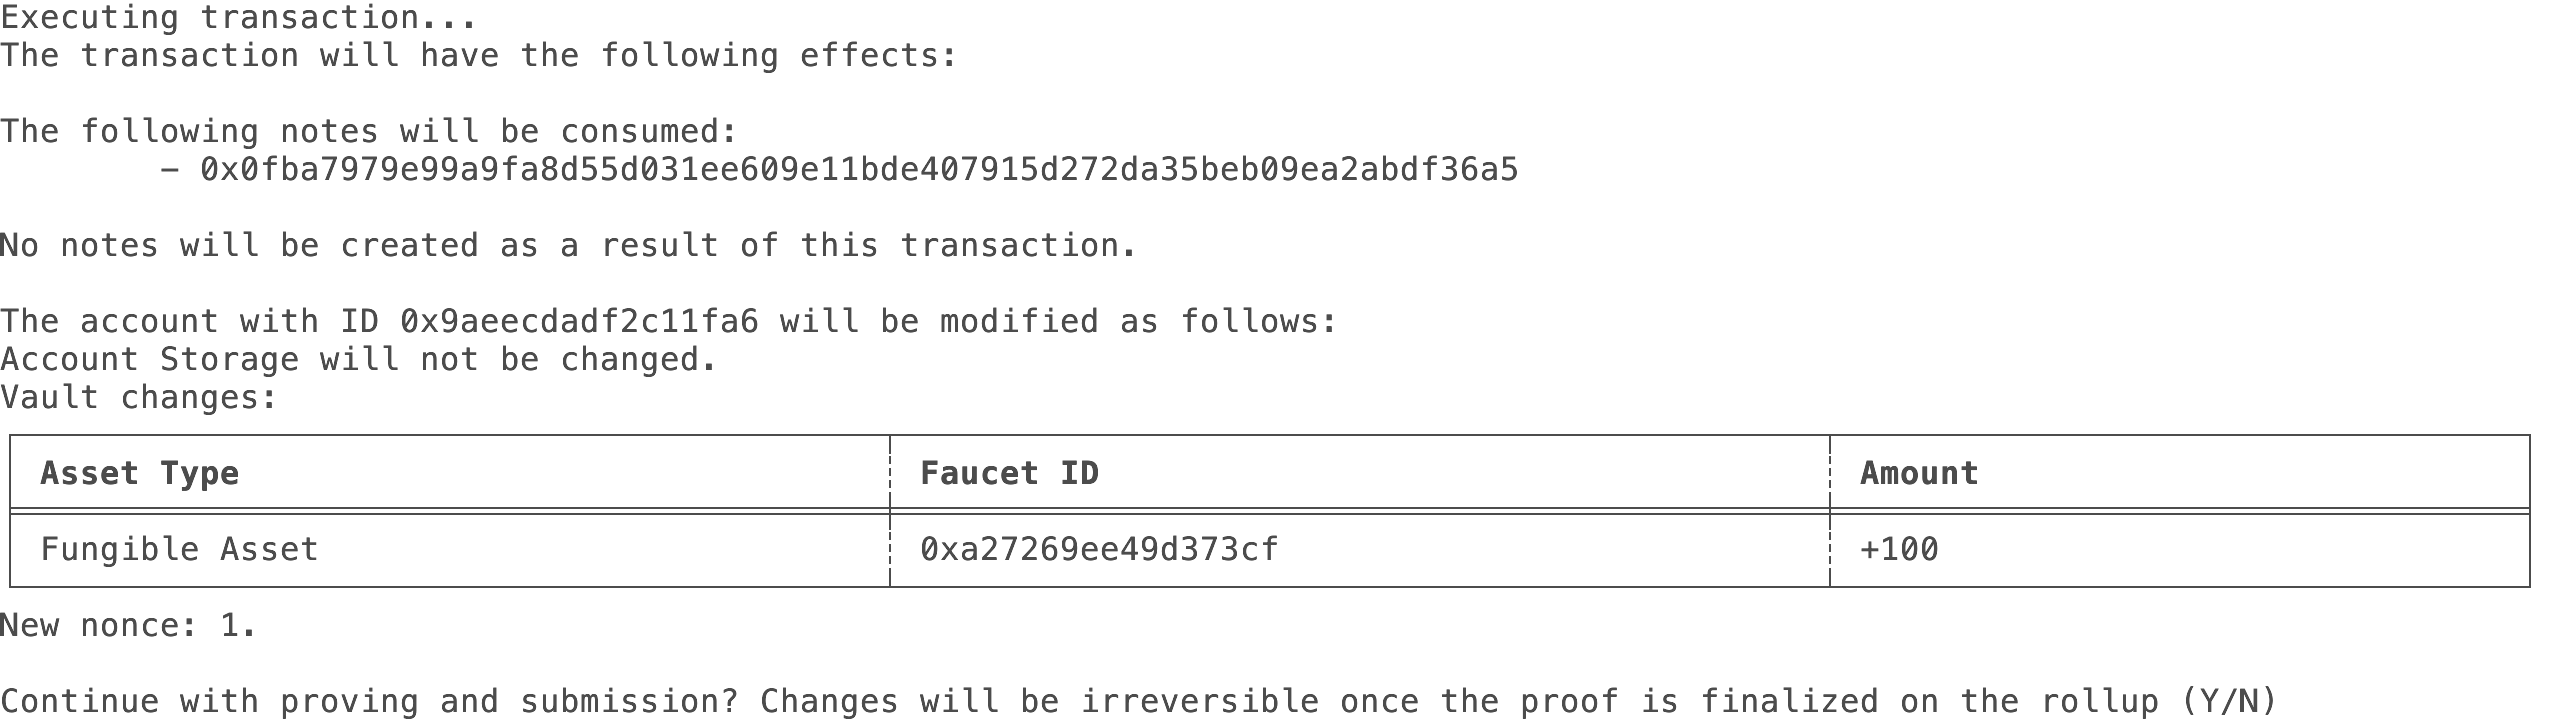
Transaction confirmation
When creating a new transaction, a summary of the transaction updates will be shown and confirmation for those updates will be prompted:
miden-client <tx command> ...

TX Summary:

...

Continue with proving and submission? Changes will be irreversible once the proof is finalized on the network (y/N)
This confirmation can be skipped in non-interactive environments by providing the --force flag (miden-client send --force ...).
Delegated proving
If a remote prover is configured, the CLI can offload the proving process to it. This is done by providing the --delegate-proving flag when creating a transaction. The CLI will then send the transaction to the remote prover for processing.
Importing and exporting
export
Export input note data to a binary file .
| Flag | Description | Aliases |
|---|---|---|
--filename <FILENAME> | Desired filename for the binary file. | -f |
--export-type <EXPORT_TYPE> | Exported note type. | -e |
Export type
The user needs to specify how the note should be exported via the --export-type flag. The following options are available:
id: Only the note ID is exported. When importing, if the note ID is already tracked by the client, the note will be updated with missing information fetched from the node. This works for both public and private notes. If the note isn't tracked and the note is public, the whole note is fetched from the node and is stored for later use.full: The note is exported with all of its information (metadata and inclusion proof). When importing, the note is considered unverified. The note may not be consumed directly after importing as its block header will not be stored in the client. The block header will be fetched and be used to verify the note during the next sync. At this point the note will be committed and may be consumed.partial: The note is exported with minimal information and may be imported even if the note is not yet committed on chain. At the moment of importing the note, the client will check the state of the note by doing a note sync, using the note's tag. Depending on the response, the note will be either stored as "Expected" or "Committed".
import
Import entities managed by the client, such as accounts and notes. The type of entities is inferred.
The --overwrite flag can be used when importing accounts. It allows the user to overwrite existing accounts with the same ID. This is useful when you want to update the account's information or replace it with a new version.
Executing scripts
exec
Execute the specified program against the specified account.
| Flag | Description | Aliases |
|---|---|---|
--account <ACCOUNT_ID> | Account ID to use for the program execution. | -a |
--script-path <SCRIPT_PATH> | Path to script's source code to be executed. | -s |
--inputs-path <INPUTS_PATH> | Path to the inputs file. | -i |
--hex-words | Print the output stack grouped into words. |
The file referenced by --inputs-path should contain a TOML array of inline tables, where each table has two fields: - key: a 256-bit hexadecimal string representing a word to be used as a key for the input entry. The hexadecimal value must be prefixed with 0x. - values: an array of 64-bit unsigned integers representing field elements to be used as values for the input entry. Each integer must be written as a separate string, within double quotes.
The input file should contain a TOML table called inputs, as in the following example:
inputs = [ { key = "0x0000001000000000000000000000000000000000000000000000000000000000", values = ["13", "9"]}, { key = "0x0000000000000000000000000000000000000000000000000000000000000000" , values = ["1", "2"]}, ]
After installation, use the client by running the following and adding the relevant commands:
miden-client
tip
Run miden-client --help for information on miden commands.
Client Configuration
We configure the client using a TOML file ([miden-client.toml]). The file gets created when running miden-client init. It can also be edited to use a different configuration for the client.
store_filepath = "store.sqlite3"
secret_keys_directory = "keystore"
default_account_id = "0x012345678"
token_symbol_map_filepath = "token_symbol_map.toml"
remote_prover_endpoint = "http://localhost:8080"
component_template_directory = "./templates"
max_block_number_delta = 256

[rpc]
endpoint = { protocol = "http", host = "localhost", port = 57291 }
timeout_ms = 10000
The TOML file should reside in same the directory from which you run the CLI.
RPC
An rpc section is used to configure the connection to the Miden node. It contains the following fields:
endpoint: The endpoint of the Miden node. It can be a specific url (like"https://rpc.devnet.miden.io") or a table with the following fields:protocol: The protocol used to connect to the node. It can be eitherhttporhttps.host: The host of the node. It can be either an IP address or a domain name.port: The port of the node. It is an integer.
This field can be set with the --network flag when running the miden-client init command. For example, to set the testnet endpoint, you can run: miden-client init --network testnet.
note
- Running the node locally for development is encouraged.
- However, the endpoint can point to any remote node.
Store and keystore
The store_filepath field is used to configure the path to the SQLite database file used by the client. The secret_keys_directory field is used to configure the path to the directory where the keystore files are stored. The default values are store.sqlite3 and keystore, respectively.
The store filepath can be set when running the miden-client init command with the --store-path flag.
Default account ID
The default_account_id field contains the default account ID to be used by the client's command when no account is provided. It is a hexadecimal string that represents the account ID. The field is optional, and if not set, the client will set it once the first account is created.
By default none is set, but you can set and unset it with:
miden-client account --default <ACCOUNT_ID> #Sets default account
miden-client account --default none #Unsets default account
note
The account must be tracked by the client in order to be set as the default account.
You can also see the current default account ID with:
miden-client account --default
Token symbol map
The token_symbol_map_filepath field is used to configure the path to the TOML file that contains the token symbol map. The token symbol map stores the faucet details for different token symbols. The default value is token_symbol_map.toml.
This file must be updated manually with known token symbol mappings. A sample token symbol map file looks like this:
# This addresses in this file are not real and are only for demonstration purposes.
ETH = { id = "0xa031cc137adecd54", decimals = 18 }
BTC = { id = "0x2f3c4b5e6a7b8c9d", decimals = 8 }
The id field is the faucet account ID and the decimals field is the number of decimals used by the token.
When the client is configured with a token symbol map, any transaction command that specifies an asset can use the token symbol instead of the asset ID. For example, when specifying an asset normally you would use something like:
1::0x2f3c4b5e6a7b8c9d
But if the faucet is included in the token symbol map (using the sample above as the mapping), you would use:
0.00000001::BTC
Notice how the amount specified when using the token symbol takes into account the decimals of the token (1 base unit of the token is 0.00000001 for BTC as it uses 8 decimals).
Remote prover endpoint
The remote_prover_endpoint field is used to configure the usage of a remote prover. You can set a remote prover when calling the miden-client prover command with the --remote-prover-endpoint flag. The prover will be used for all transactions that are executed with the miden command. By default, no remote prover is used and all transactions are executed locally.
Component template directory
The component_template_directory field is used to configure the path to the directory where the account component templates are stored. The default value is ./templates.
In this directory you can place the templates used to create the account components. These templates define the interface of the account that will be created.
A sample template file looks like this:
name = "basic_fungible_faucet"
description = ""
version = "0.1.0"
supported-types = ["FungibleFaucet"]

[[storage]]
name = "token_metadata"
description = "Contains metadata about the token associated to the faucet account"
slot = 0
value = [
    { name = "max_supply", type = "felt", description = "Maximum supply of the token in base units" },
    { name = "decimals",type = "u8", description = "Number of decimal places" },
    { name = "ticker", type = "token_symbol", description = "Token symbol of the faucet's asset, limited to 4 characters." },
    { value = "0" },
]
Block Delta
The max_block_number_delta is an optional field that is used to configure the maximum number of blocks the client can be behind the network.
If not set, the default behavior is to ignore the block difference between the client and the network. If set, the client will check this difference is within the specified maximum when validating a transaction.
miden-client init --block-delta 256
Environment variables
MIDEN_DEBUG: When set totrue, enables debug mode on the transaction executor and the script compiler. For any script that has been compiled and executed in this mode, debug logs will be output in order to facilitate MASM debugging (these instructions can be used to do so). This variable can be overridden by the--debugCLI flag.
Troubleshooting and transaction lifecycle (CLI)
This guide helps you troubleshoot common issues and understand the end-to-end lifecycle of transactions and notes in the Miden client.
TL;DR checklist
Note: This section applies to the Miden CLI client. Guidance for the Rust and Web clients may differ.
- Ensure you are running commands in the same directory that contains
miden-client.toml. - If you need a clean local state, delete the SQLite store file referenced by
store_filepath(default:store.sqlite3). It will be recreated automatically on the next command. - Verify your node RPC endpoint is reachable and correct in
miden-client.toml. - Run with debug output when troubleshooting: add
--debugor setMIDEN_DEBUG=true. - Run
miden-client syncto refresh local state after errors involving missing data or outdated heights.
Enable debug output
- CLI flag:
miden-client --debug <command> ...(overridesMIDEN_DEBUG) - Environment variable:
MIDEN_DEBUG=true
When enabled, the transaction executor and script compiler emit debug logs that help diagnose MASM-level issues (you can also consult the Miden VM debugging instructions).
Typical CLI outputs when debugging
# Enable debug output for a command
miden-client --debug send --sender <SENDER> --target <TARGET> --asset 100::<FAUCET_ID>

# Force non-interactive submission (e.g., CI)
miden-client send --force ...

# Refresh local state
miden-client sync
If you see a gRPC error, it may include a status-derived kind (e.g. Unavailable, InvalidArgument) which narrows possible causes.
Common errors and how to resolve
Below are representative errors you may encounter, their likely causes, and suggested fixes.
RpcError.GrpcError: Unavailable / DeadlineExceeded
- Cause: Node is down, unreachable, or behind a load balancer that blocked the request.
- Fix: Check
rpc.endpointinmiden-client.toml, verify the node is running/accessible, and retry.
RpcError.InvalidArgument / ExpectedDataMissing / InvalidResponse
- Cause: Malformed request parameters or unexpected server response.
- Fix: Re-check command flags/inputs. If using partial IDs, ensure they map to a single entity. Update to the latest client if the server API has changed.
Client/network compatibility mismatch
-
Cause: Client and network versions or the genesis header commitment are incompatible.
-
Symptoms: CLI may report messages like:
accept header validation failed: server rejected request - please check your version and network settingsor requests being rejected due to a mismatched genesis header commitment.
-
Details: These are validated by the node by verifying client headers on gRPC requests.
-
Fix: Ensure your client version matches the target network. Switch to the correct network or upgrade/downgrade the client accordingly. Verify the configured genesis header commitment matches the network, then retry.
ClientError.AccountDataNotFound(<account_id>)
- Cause: The account is not known to the local store yet.
- Fix: Create/import the account first, or run
miden-client syncto fetch it if it exists on-chain.
ClientError.AccountLocked(<account_id>)
- Cause: Attempting to modify a locked account.
- Fix: Unlock or use another account as appropriate.
ClientError.StoreError(AccountCommitmentAlreadyExists(...))
- Cause: Trying to apply a transaction whose final account commitment is already present locally.
- Fix: Ensure you are not re-applying the same transaction. Sync and check transaction status.
ClientError.NoteNotFoundOnChain(<note_id>) / RpcError.NoteNotFound(<note_id>)
- Cause: The note has not been published/committed yet or the ID is incorrect.
- Fix: Verify the note ID. If it should exist, run
miden-client syncand retry.
ClientError.TransactionInputError / TransactionScriptError
- Cause: Invalid transaction inputs, script logic errors, or failing constraints.
- Fix: Run with
--debugto collect execution logs. Validate input notes, foreign accounts, and script assumptions.
ClientError.TransactionProvingError
- Cause: Local proving failed or remote prover returned an error.
- Fix: If using remote proving, verify
remote_prover_endpointis reachable and add--delegate-proving. Check prover logs.
Recency/block delta errors
- Cause: Client is too far behind the network and validation enforces a max delta.
- Fix: Run
miden-client syncor increasemax_block_number_deltaviamiden-client init --block-delta <N>and re-run.
Transaction lifecycle (CLI-oriented overview)
For the full protocol-level lifecycle, see the Miden book: Transaction lifecycle.
flowchart LR
    A[Build Request] --> B[Validate Request]
    A -.->|optional| C[Collect/Insert Input Notes]
    A -.->|optional| D[Load Foreign Accounts]
    B -.->|optional| K[Insert Public Note Recipients]
    B --> E[Execute Transaction]
    E --> F[Prove Transaction]
    F --> G[Submit to Node]
    G --> H[Track Locally]

    subgraph Tracking
      H --> I[Update Account State]
      H --> J[Update Notes/Tags]
    end
Key states the CLI surfaces:
- Transaction status:
Pending(after execution),Committed(after node inclusion),Discarded(not included). - Input notes:
Expected→Processing→Consumed(after sync) orCommittedif fetched with inclusion.
Recovery flow
- Re-run with
--debugorMIDEN_DEBUG=truefor richer logs. - Verify
rpc.endpointconnectivity and timeouts. - Run
miden-client syncto refresh local headers/notes. - If local DB is inconsistent for development purposes, delete
store.sqlite3(or configured path) and retry. - Adjust
max_block_number_deltaif strict recency checks block validation. - If proving errors persist with a remote prover, confirm
remote_prover_endpointand consider running locally to isolate the issue.
References
- CLI debug flag and environment variable are documented in
CLIandConfigdocs. - Common error enums originate from the client and RPC layers.
- Protocol lifecycle: Miden book — Transaction lifecycle